GENEVO LP
USER MANUAL
CONGRATULATIONS ON PURCHASING GENEVO LP
MAIN FEATURES OF GENEVO LP:
GENEVO LP can be installed in the following specifications:
- GENEVO LP (standalone version)
- GENEVO LP as an extension for GENEVO built-in systems (GENEVO PROTECTOR, PRO/PRO II)
- GENEVO LP as an extension for GENEVO built-in systems with GENEVO HOME MODULE (gate opener extension)
Use the device only in accordance with the user manual. Never use a damaged device!
SYSTEM COMPONENTS:
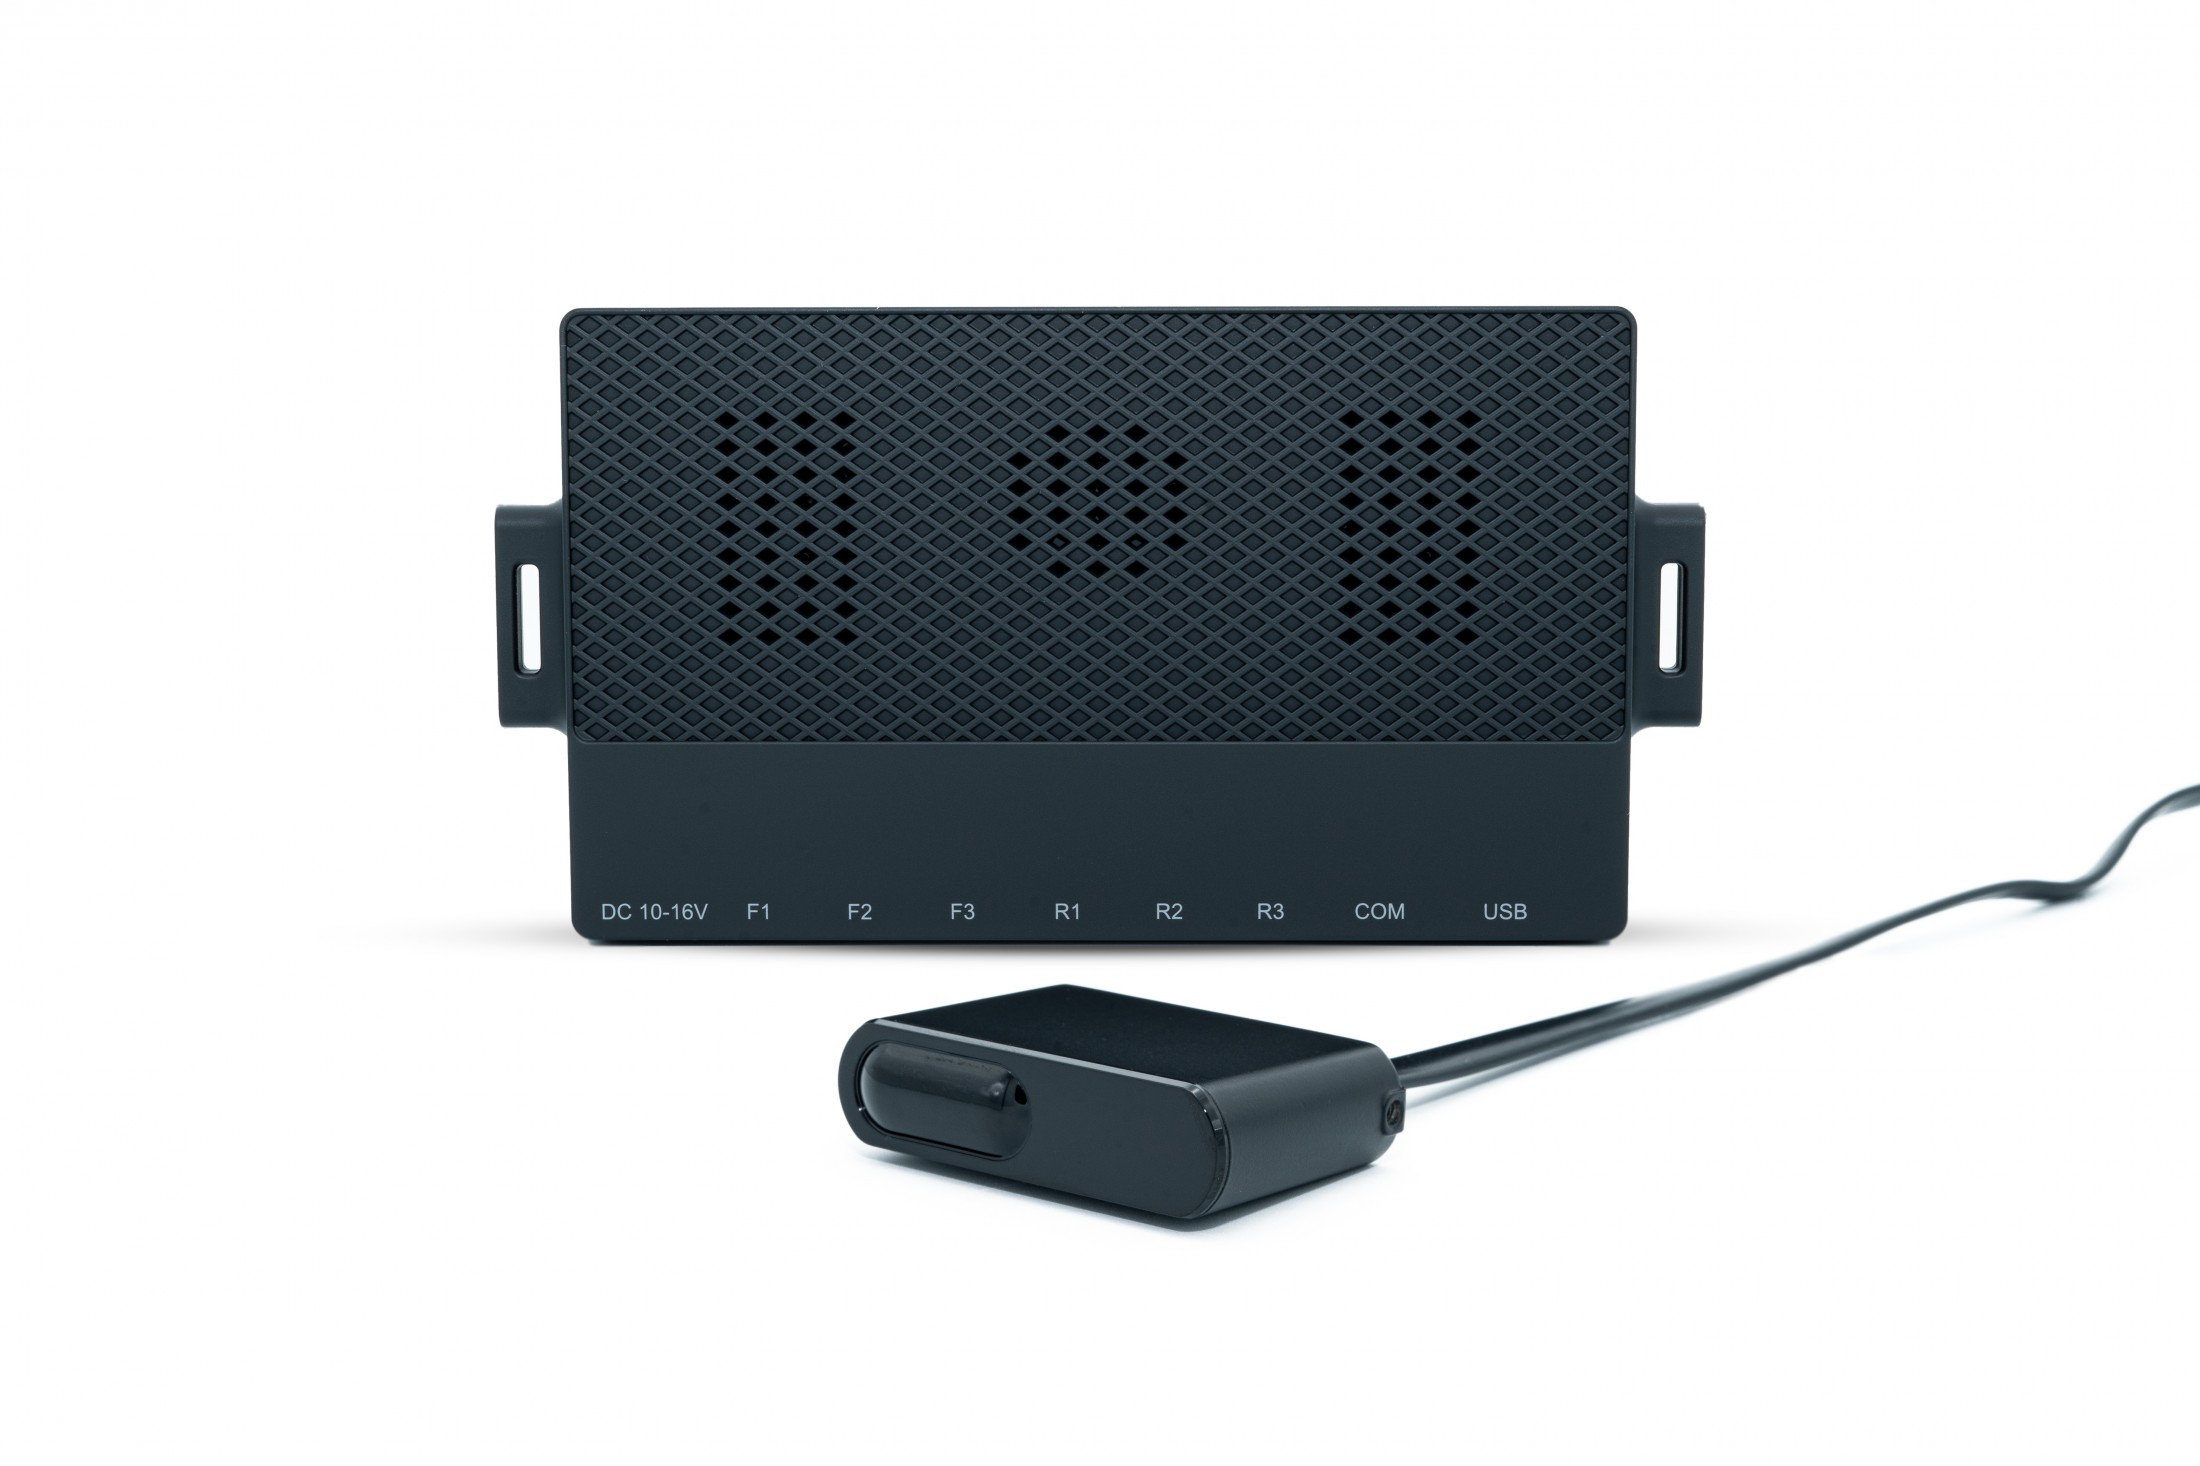
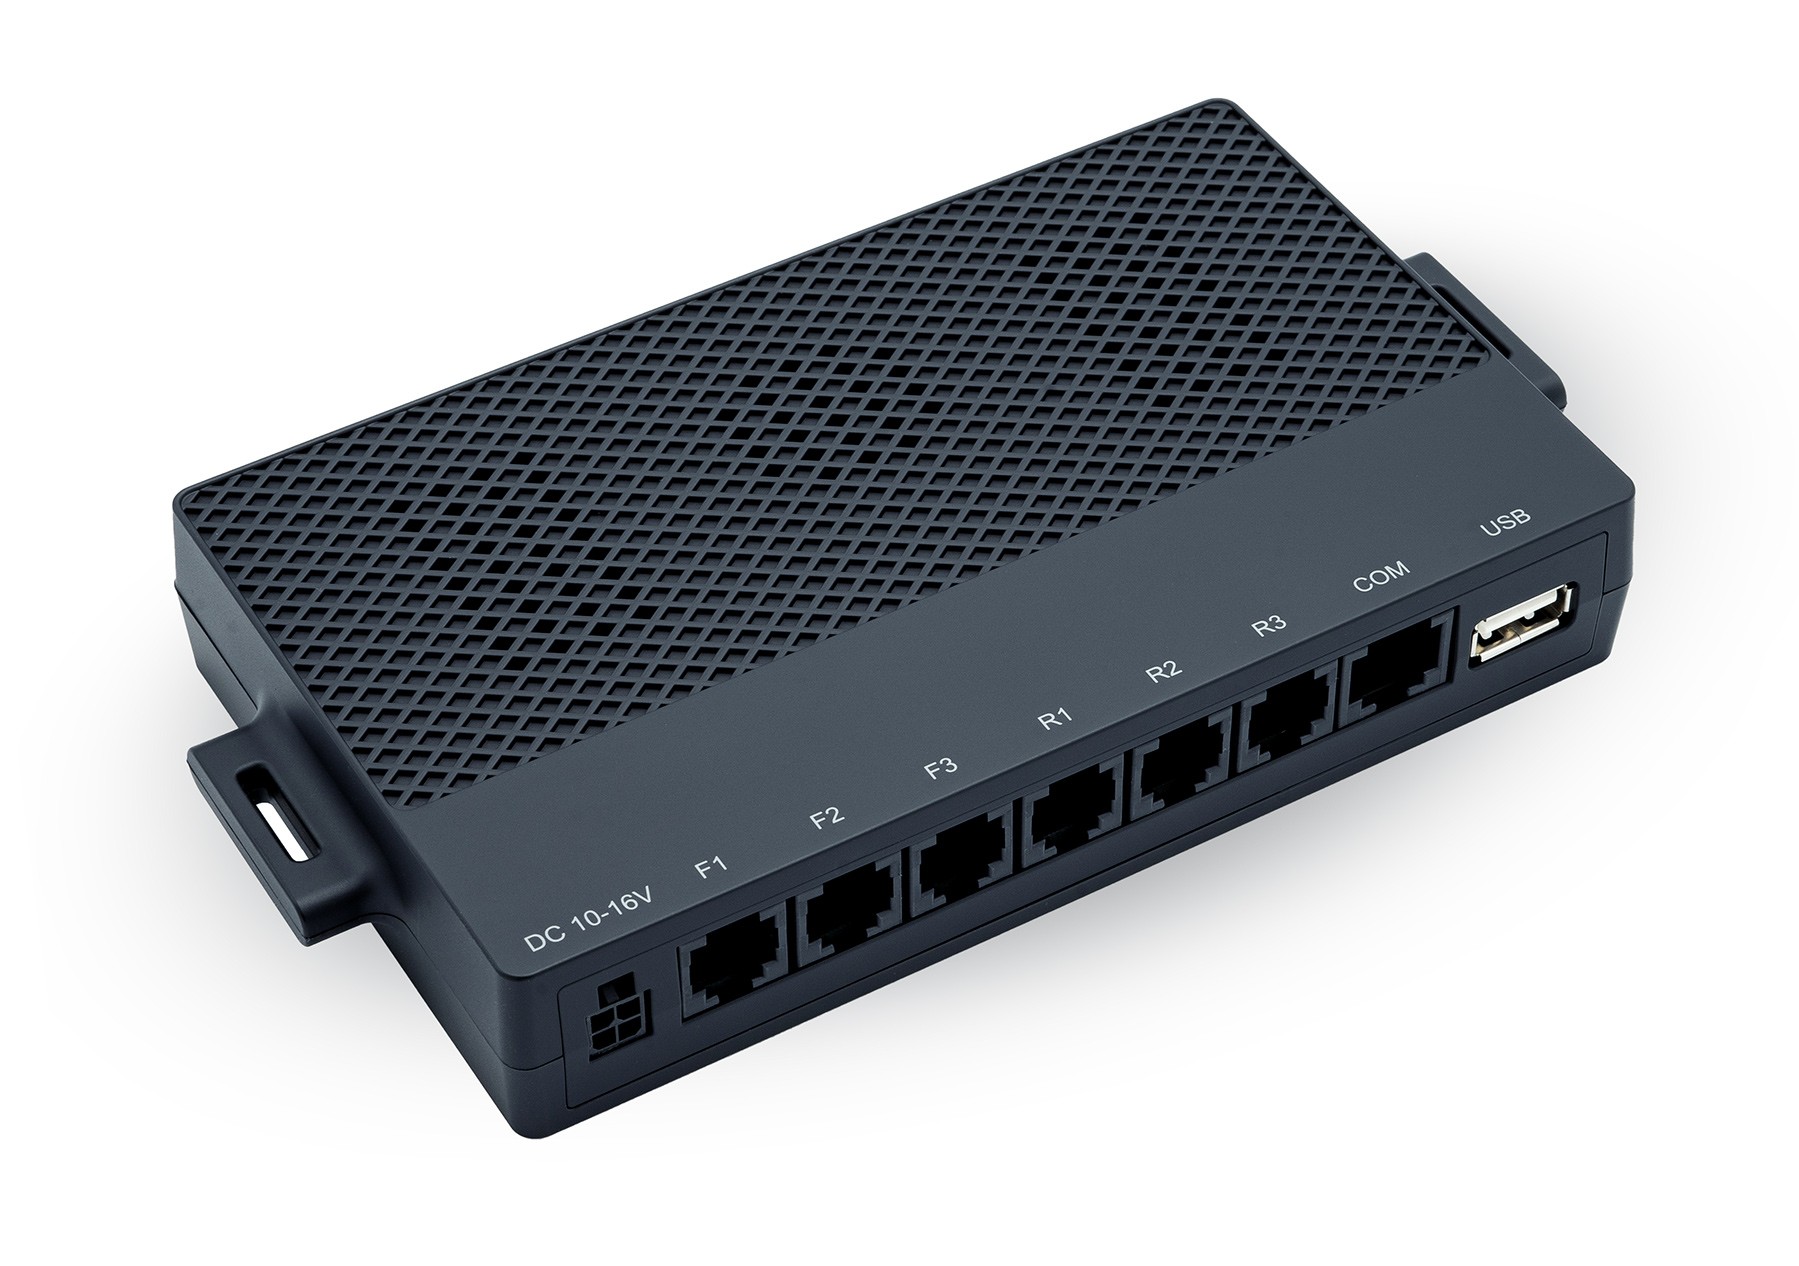
The GENEVO LP system includes:- 1x GENEVO LP Control unit
- 1x (Optional) extension unit GENEVO HOME MODULE
- 1x (Standalone version) cable control harness including: capacitive button, buzzer, LED alert diode
- x Laser sensor(s) - according to your configuration
- x Extension cables for sensors - according to your configuration
- 2x Power cable (12V)
- 1x Cable with RJ45 connector
- 1x Flash drive for device updates
- 1x USB Extension cable for updates
- 1x Mounting accessories
ALERT INTERPRETATION:
Alert interpretation depends on on whether the product was installed as a standalone or in connection with built-in systems, each of them has a different interpretation of alerts.
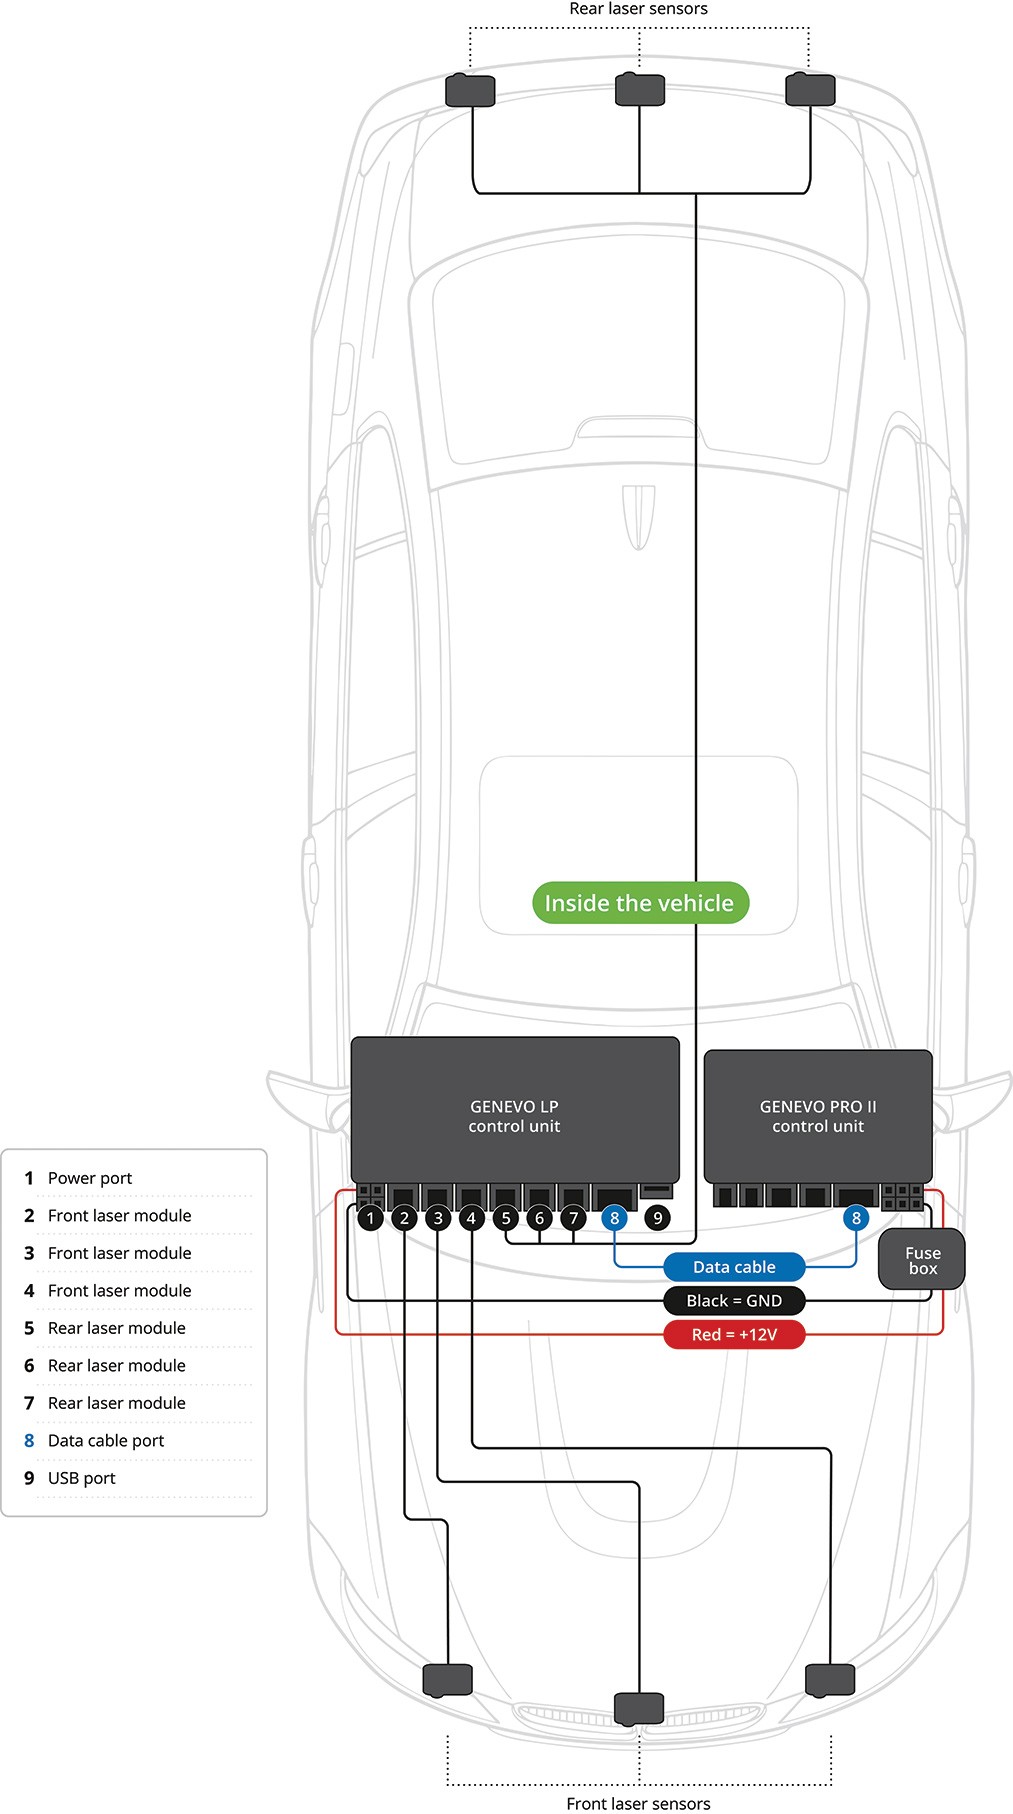
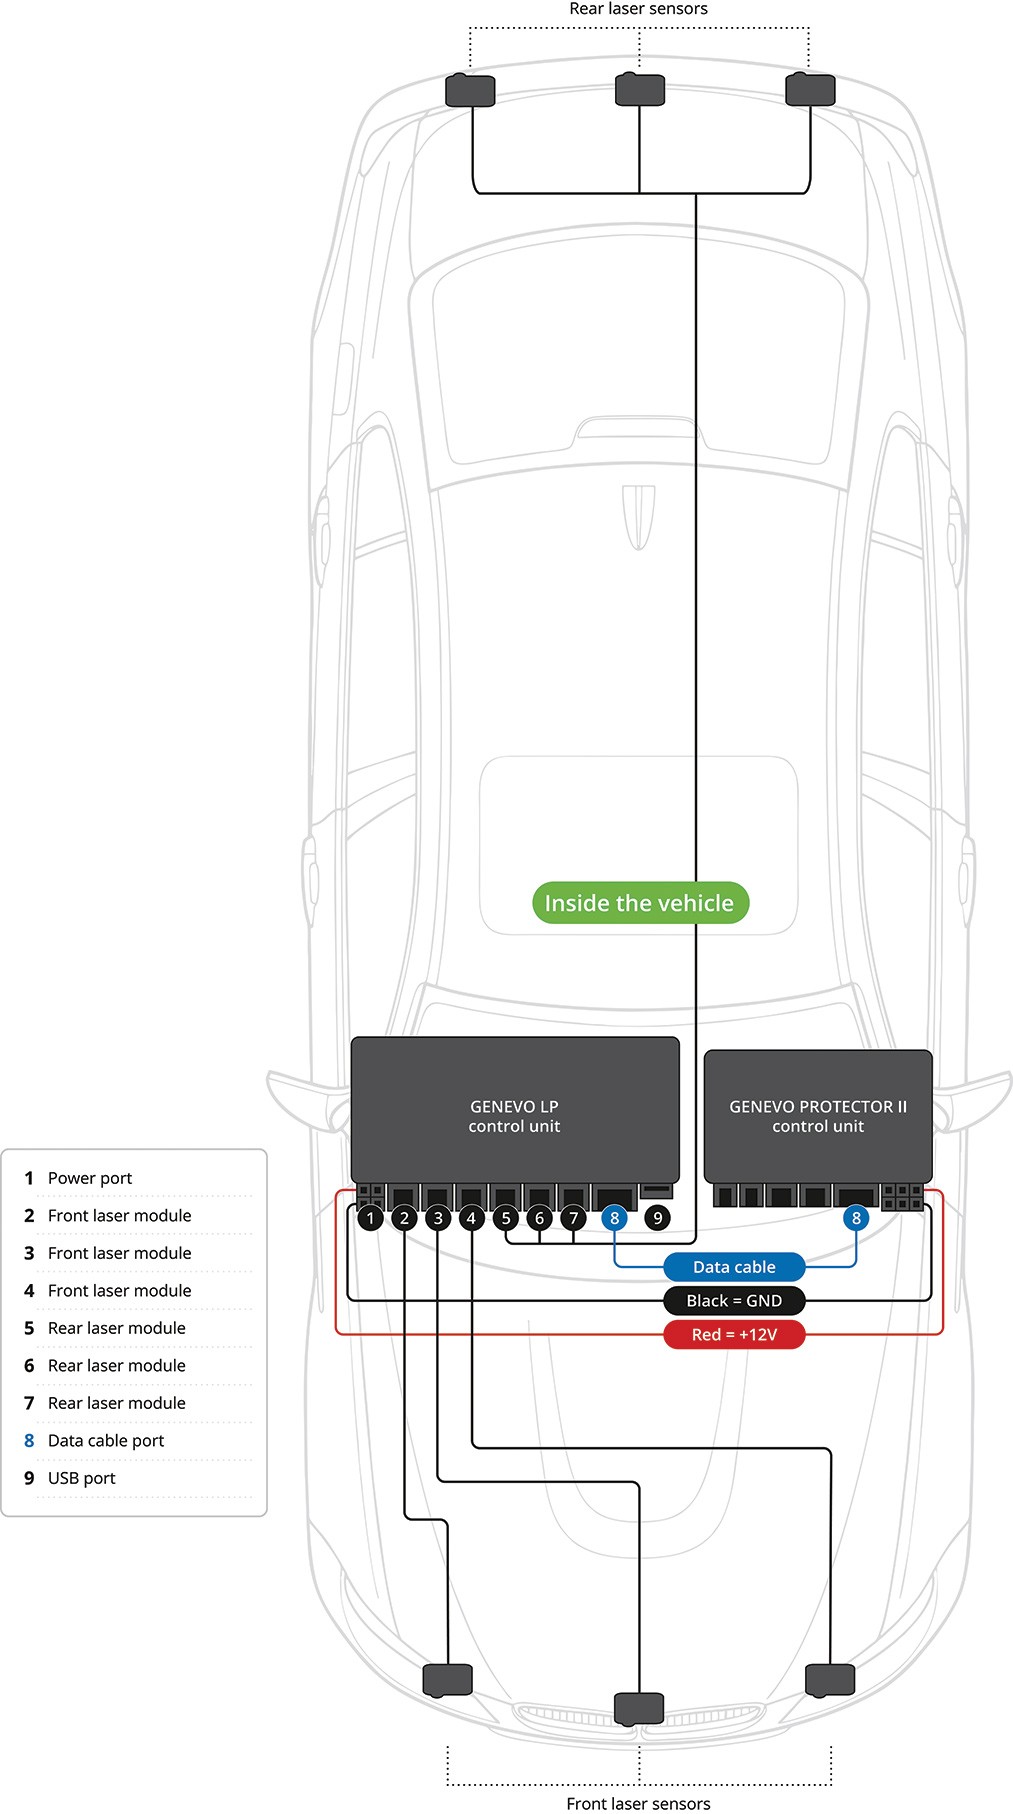
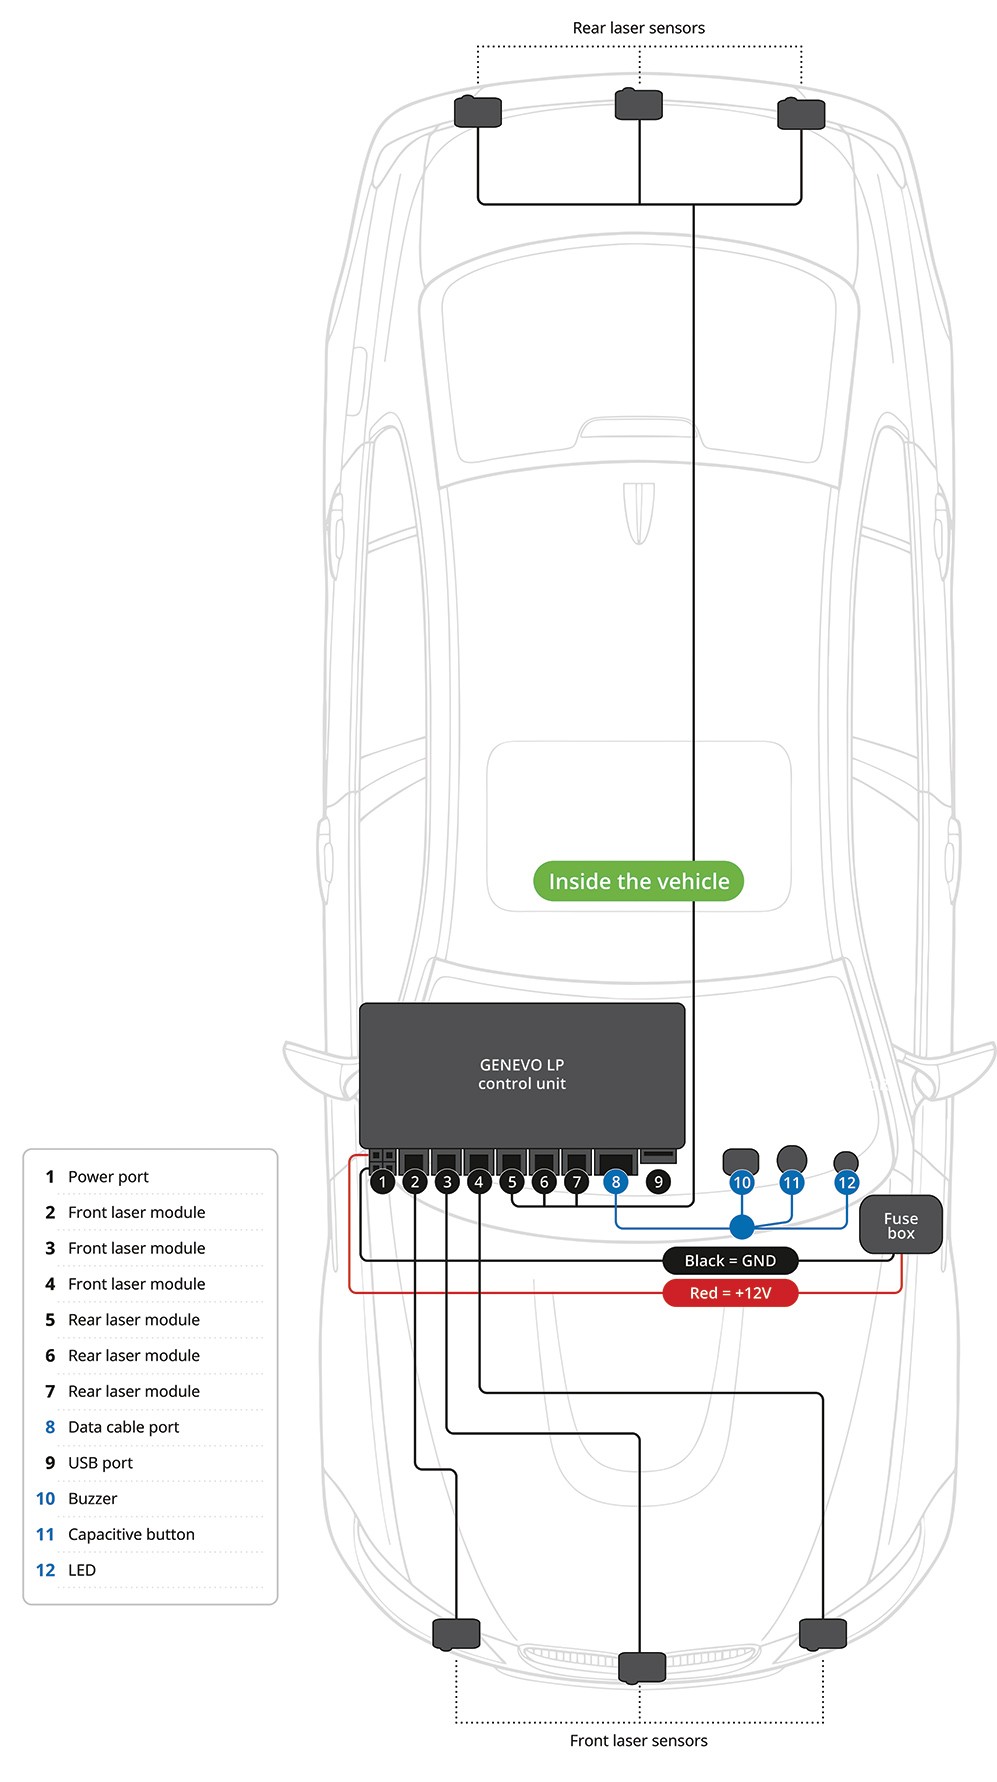
CONNECTION SCHEME
Connection with GENEVO PRO / PRO II built-in systems
Connection with GENEVO PROTECTOR II built-in system
Connection of GENEVO LP stand-alone version
USER SETTINGS
GENEVO LP STANDALONE VERSION CONTROLS:
Stand Alone Control set is optional upon request.
TURN ON: Both units turn on automatically when voltage is applied, no buttons on the control harness need to be pressed. When the GENEVO LP unit is turned on, an audible chime will sound and the LED on the cable harness will flash twice.
TURN OFF: The GENEVO LP can be turned off by holding down the button on the control panel for 3 seconds. A beep will sound and the LED will flash when it is turned off. A short press of the button will turn the GENEVO LP unit back on. To turn off the GENEVO HOME MODULE unit, the power supply to the device must be interrupted.
CHANGING THE VOLUME: LOW/MEDIUM/HIGH - During Idle, the volume of the GENEVO LP can be adjusted using a button on the control harness and offers three volume levels. Each time the button is pressed, the volume switches to the next level in this order: low -> medium -> high.
IDLE MODE: The jammer is ON and has an active jamming function. The LED will be ON or OFF, depending on the device's settings.
JAMMER DEACTIVATION: By a short press during the alert, GENEVO LP will stop jamming but continue to detect the laser, and the sound will change to detection mode. If the button is pushed again during detection, the detection will also stop. After the detection, a 30-second cooldown will start. After those 30 seconds, the ”Starting Sequence” will confirm that laser jamming is active again.
UPDATE SEQUENCE / SETTINGS CHANGE: When the USB flash drive is inserted into the control unit, the LED flashes quickly until the update is complete. When an update is completed, a successful Starting Sequence will be shown. If there is an error, the LED blinks five times and beeps three times.
SYSTEM DEACTIVATION: Press the button six times to disable the whole system. The system will be non-functional until a firmware update is done. After the FW update, the system will start working again.
GATE OPENER: When the system approaches the already paired sensor, the LP will alert with a unique sound, and the GATE OPEN command will be sent.
GENEVO LP STANDALONE VERSION SETUP - USING PC:
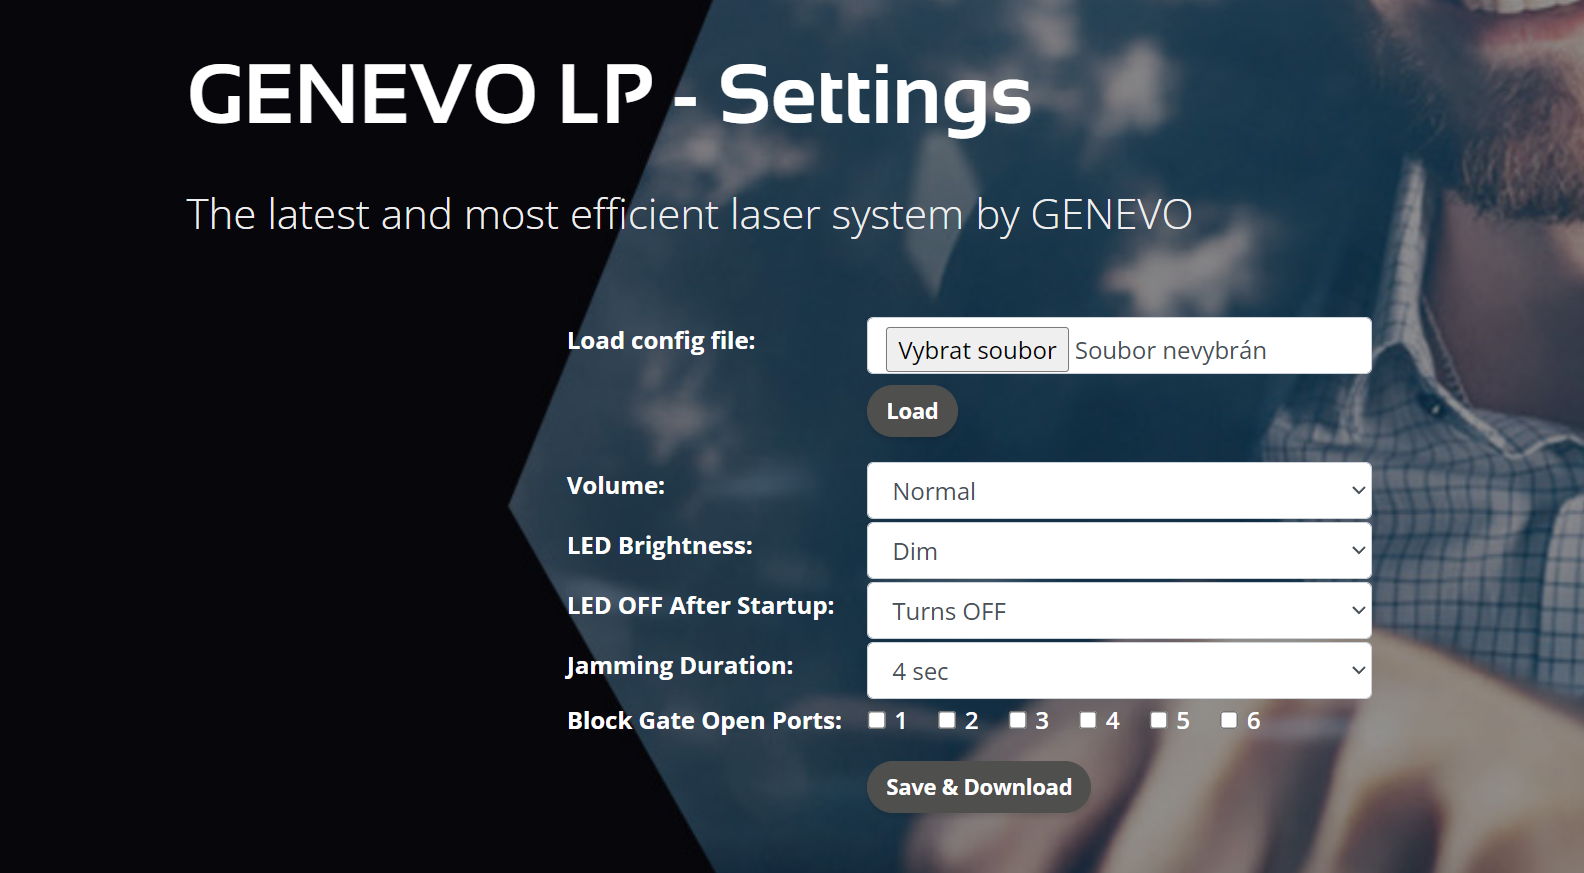
Settings are done using the > www.genevolp.com/settings website.
Load config file: Select your configuration file from the GENEVO LP flash drive
Volume: Volume selection (1 - Reduced, 2 - Normal, 3 - High)
LED Brightness: LED Brightness - (Level - 1 to 5)
LED OFF After Startup: LED light during operation (Always on, Turns off)
Jamming Duration: Jamming duration setting (1 - 9 s; 0- UNLIMITED)
Block Gate Open Ports: Only for version with HOME MODULE (Remote electric gate opener). Select the ports (sensors) you want to block from triggering the gate opening. For example, you can select rear sensors in ports 4,5,6 if you do not want the gate to open with rear sensors (when leaving).
Click Save & Download to download the file and then replace the existing cofiq file on the USB flash drive with it. After connecting the flash drive to your device, the selected settings will be applied.
GENEVO PRO II INTERFACE SETTINGS:

LASER DETECTION: ON/OFF - Selecting “ON” opens additional settings of the optional laser accessory.
LASER PROTECTION: Select GENEVO LP from the list of options:
- LP - GENEVO LP
- OFF - No laser accessory
PROTECTION: OFF/DETECTION ONLY/0-9S/UNLIMITED
- Sets the protection time of the optional laser accessory. With the “DETECT ONLY” option you will be only informed about laser measurement by connected laser accessory or by the PRO II radar antenna if no accessory is connected.
LASER NAME: OFF/NO VOICE/VOICE
- Announces the name of the laser during the warning.
GENEVO PROTECTOR II INTERFACE SETTINGS:
ACCESSING USER MENU:
- Web interface using your sign-in data.
- By holding the control button.
Laser protection can be set from 1-9 seconds or permanently, either wait for the jamming to turn off automatically, or you can turn it off manually by pressing the control button. You can change the duration of the jamming in the web interface: setup.genevo-protector.com.
USING THE CONTROL BUTTON:
By holding the control button (when the system is switched on) you can go through menu settings. The system will always tell you the functions that can be changed in words. When you release the control button, the function is changed. The system always confirms the change with a confirmation message.
CHANGING THE LASER SETTINGS:
This function is used to turn the laser module on and off. After holding down the control button, the system will first give you a voice warning: "Change laser settings". When you hear this message, release the control button, and the laser module will power on or power off. If you do not release the button, you continue to the next function.
HOME MODULE
Connecting the optional GENEVO HOME MODULE: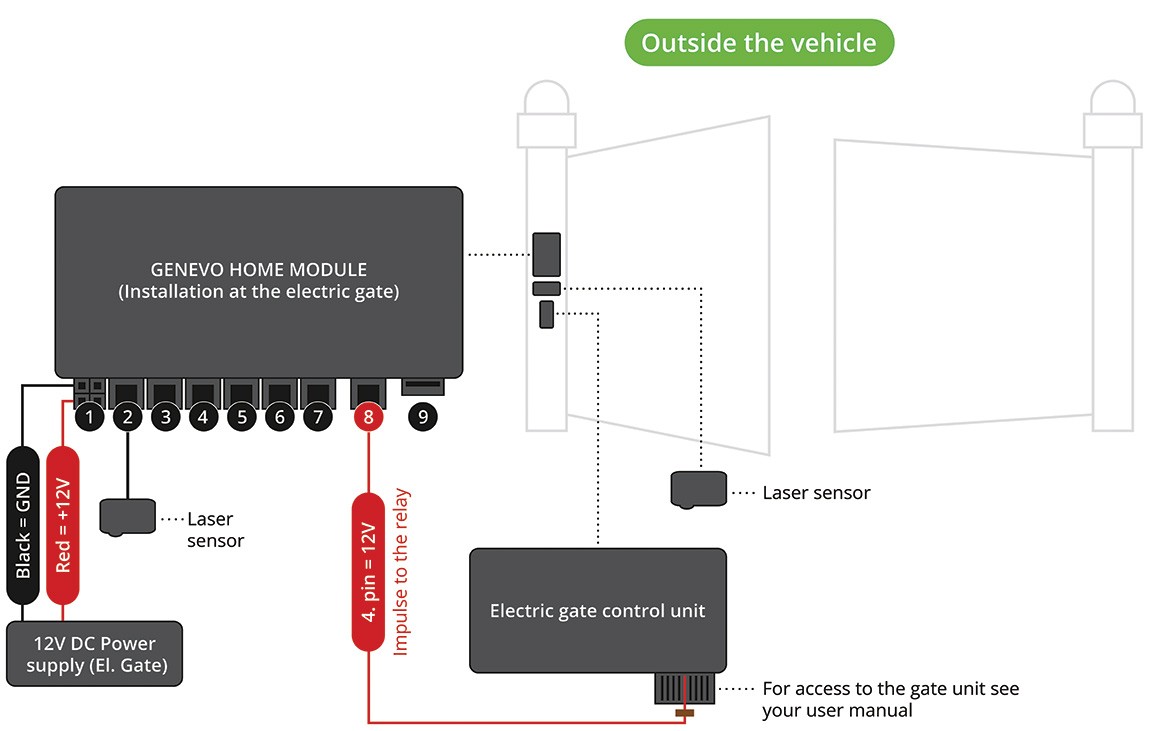
For the correct functioning of the device, we recommend that you first pair the device and then proceed with physical installation in the vehicle and on in the gate.
PAIRING:
Pairing the GENEVO LP and HOME MODULE together is necessary for the system to function properly, you can pair multiple GENEVO LP units to one HOME MODULE. You can also pair multiple HOME MODULE units to a single GENEVO LP.
PAIRING PROCEDURE:
- 1. Format the included Flash drive to a FAT32 standard on your computer.
- 2. Connect the whole assembly according to the connection scheme above (min. 1x sensor with GENEVO LP, and 1x sensor with HOME MODULE).
- 3. Switch on the power supply for both units, i.e. GENEVO LP and HOME MODULE.
- 4. Make sure that the sensors from the GENEVO LP and from the HOME MODULE are in optical contact. For pairing, we recommend to keep the sensors at a distance of 0.5m from each other.
- 5. Insert the included flash drive into the HOME MODULE device.
- 6. Wait 10 seconds.
- 7. Remove the flash drive from the HOME MODULE unit and insert it into the switched on GENEVO LP unit.
- 8. Wait 10 seconds.
- 9. Turn both devices OFF and ON again.
- 10. Now you have paired GENEVO LP and HOME MODULE.
HOME MODULE INSTALLATION INSTRUCTIONS:
Warning - The HOME MODULE unit is not waterproof and must be hidden from the elements!
The HOME MODULE unit needs to be powered with 12V. After connecting the cable with the RJ45 connector, you need to connect the cable from the 4th pin to the 5th pin to the relay coil from your electric gate. (When the sensors detect each other, a 12V switching pulse is sent to this vein. This pulse is sent once per minute during optical contact and its duration is 200ms.
Installation of the GENEVO HOME MODULE control unit
The control unit continuously evaluates the signals from the LP laser sensors and other modules. The unit is usually located near the GENEVO LP laser sensors, or near the control system and gate operator. The power supply is provided by connecting to the power circuit of the gate drive (the low voltage part of the 12V). The standard marking convention of red 12V cable (plus), black cable (GND) applies.
Laser sensor installation - outdoor sensors
They must be installed on the non-moving part of the gate post/carrier system. The sensors from your HOME MODULE must always be installed in a horizontal position and up to a maximum height of 2 meters. The sensor face must not be obstructed by any objects.
Take extra care not to damage the cable or connector during installation and use the "heat shrink tube" that is included in the package. (damage to the cable or removal of the connector will void the warranty). The sensor cable is then connected to the GENEVO HOME MODULE unit.
SYSTEM UPDATES:
The system can be updated in two ways:
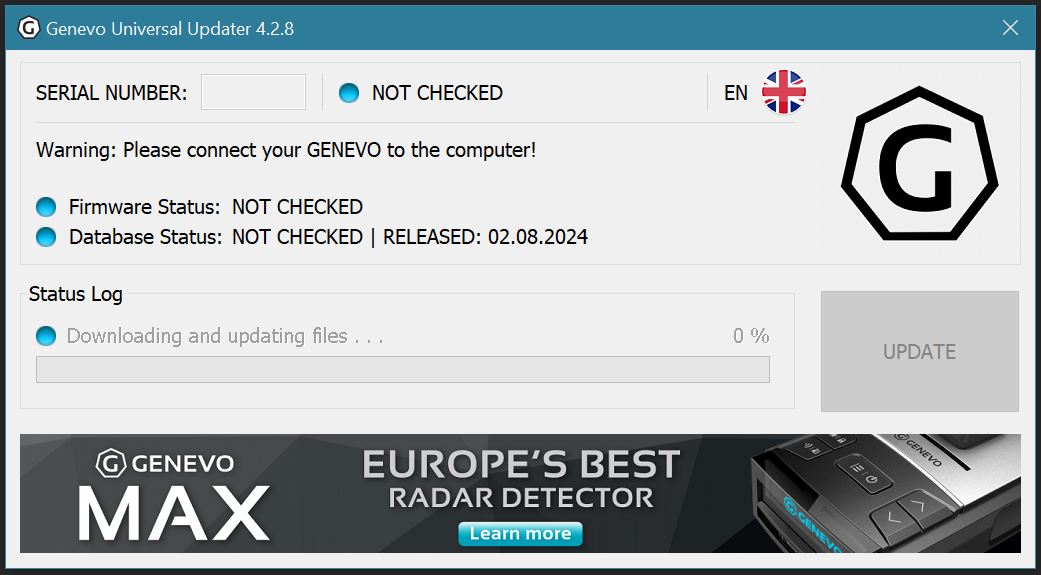
- 1. Online (for WIN and MacOS) at: genevoupdate.com
- 2. By downloading the updater software for Windows OS at: genevo.com/en/updates
UPDATE PROCEDURE:
To update your device, proceed as follows:- Format your flash drive to FAT32 (the included flash drive comes formatted).
- Insert the flash drive into your device and wait 10 seconds.
- A device status file will be generated on your flash drive, e.g.:
GENEVO LP
S/N: LPH12345
- The serial number is needed for updating your device.
Update procedure using the genevoupdate.com websites (for WIN and MacOS):

- Enter the serial number in the dedicated field at the genevoupdate.com home page.
- Click on the "verify and update" button.
- Click to download all in one .Zip archive.
- Insert the flash drive into your computer.
- Unzip the files from the archive to the flash drive.
- The cable harness or your detector will inform you of successful update. While the GENEVO LP is being updated, the LED on the control harness will flash continuously. After successful completion, GENEVO LP will turn ON automatically. In the event of an error, the LED on the control harness will flash five times and the LED will beep three times. If you have GENEVO LP connected to another GENEVO device, your GENEVO device will inform you about the successful update progress. In the case of the HOME MODULE, you can check the update so that there is no downloaded FW left on the flash drive.
- After a successful update, you can remove the flash drive.
Update procedure using the genevo updater.exe (Windows)
- Download and run the GENEVO Updater.exe.
- Insert the flash drive to your PC.
- Click on the "DOWNLOAD" button GENEVO updater.
- Make sure the ignition of your vehicle is completely off and insert the GENEVO USB flash Drive in your device.
- Start your car, the display, or cable harness will show the update process, after completion, remove the flash drive.
- Done! Your device has been successfully updated.
GENEVO LP INSTALLATION:
Only manufacturer-trained installation centers may install the equipment. Contact your dealer for information on available service centers. For full installation manual please contact your distributor.
BRIEF INFORMATION:
The laser system control unit is installed in the interior of the vehicle. The only important thing is that the control unit must not get into contact with water.
Laser sensors can be mounted on the front of the vehicle in the front grill, above the bumper or in the rear of the vehicle. Be extra careful not to damage the wiring, sensors, or connectors during the installation, as it will void the product warranty.
Place the sensors so that they have a clear view to the front or the rear of the car. Make sure that the sensor is held firmly and can withstand vibrations caused by driving and is still in horizontal front/rear facing position.
TECHNICAL PARAMETERS:
Operating temperature: -20°C to +80°C / -4 F +176 F
Laser Class 1 (according to IEC 60825-1)
Operating voltage: 10V - 16V
Power consumption: 11W
Connector polarity: negative is GND
Power fuse: 3A
Wavelength: 905nm
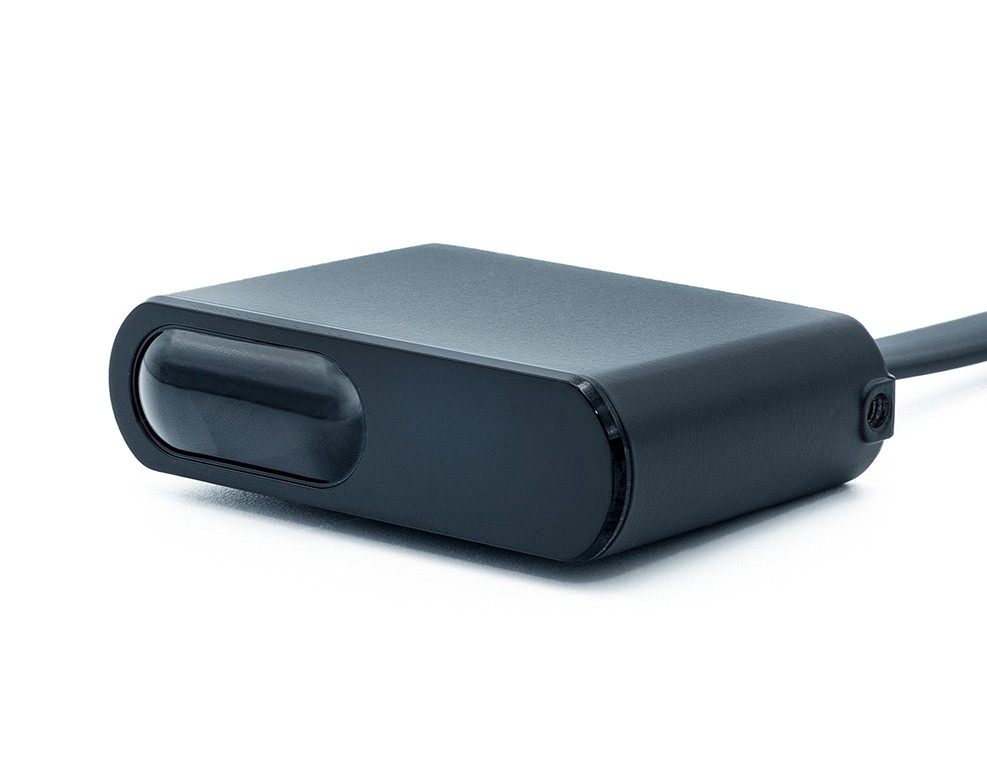
DIMENSIONS:
GENEVO LP unit / HOME MODULE:
Width 166 mm
Height 88 mm
Depth 26 mm
GENEVO LP sensor:
Width 53 mm
Height 15 mm
Depth 37 mm
ADDITIONAL INFORMATION & SAFETY:
Installation: We recommend having the device installed by professional installation centers. The system contains highly sensitive components; correct assembly is critical for its functionality.
LASER SAFETY: Class 1 Laser Product. Do not stare into the beam or view directly with optical instruments. This product contains an uncollimated laser diode producing a highly divergent beam.
CAUTION: Use of controls or adjustments or performance of procedures other than those specified herein may result in hazardous radiation exposure.
Compliance: This product complies with FDA performance standards for laser products, 21 CFR 1040.10 and 1040.11, except for deviations pursuant to Laser Notice No. 50, dated June 24, 2007.
Legal Notice: Laser defense systems may be restricted or prohibited in certain states. It is the user's responsibility to check and comply with all state and local laws before use.
Disposal: If you wish to discard electrical and electronic equipment, please contact your dealer or supplier for further information.
Warning: Never, under any circumstances, look at the sensors while powered on and operating. Do not view with optical instruments (like magnifiers).
⚠️ WARNING: Cancer and Reproductive Harm - www.P65Warnings.ca.gov
This product may contain chemicals, such as lead, known to the State of California to cause cancer and birth defects or other reproductive harm.
CE - DECLARATION OF CONFORMITY
The manufacturer, GENEVO s.r.o., hereby declares that GENEVO LP equipment complies with the essential requirements and other relevant provisions of Directive 2014/53/EU. The full Declaration of Conformity can be downloaded here: www.genevo.com/en/ce
HOMOLOGATION
GENEVO LP was grated a homologation of a type of electrical/electronic sub-assembly with regard to Regulation No. 10.
Version: 2026-01-03
Manufacturer: GENEVO s.r.o., Radčina 497/22, Liboc, 161 00, Praha 6
Brand Representative: GENEVO AMERICA, 12557 New Brittany Blvd 3 v1005, Fort Myers, FL 33907
MADE IN KOREA